
使用 Arduino Uno 生成短脉冲 第 3 部分:使用 nop 指令改变脉冲宽度
在我们之前的文章 使用 Arduino Uno 生成短脉冲 第 2 部分:GPIO 寄存器访问脉冲宽度 中,我们详细介绍了如何使用直接 GPIO 端口寄存器写入生成极短的 125ns 脉冲。
基于我们之前文章的代码,可以使用 NOP 指令以相当高的分辨率改变脉冲长度。
NOP 指令是微控制器的机器指令,什么也不做(但通过 NOP 什么也不做恰好需要一个 CPU 周期,实际上会导致非常小的延迟)。延迟等于一个时钟周期 - 在 16 MHz 主时钟频率(如 Arduino Uno)下,这相当于 1/16MHz = 62.5ns。
我们可以使用 #include <avr/cpufunc.h> 中可用的 _NOP() 宏 将 NOP 集成到之前文章的代码中
nop_pulse.ino
#define PORT11 PORTB
#define PIN11 3
#define PIN11_MASK (1 << PIN11)


void loop() {
    cli(); // Disable interrupts
    PORT11 |= PIN11_MASK; // Turn pin 11 on
    _NOP();
    PORT11 &= ~PIN11_MASK; // Turn pin 11 off
    sei(); // Enable interrupts again

    delay(10); // Wait 10ms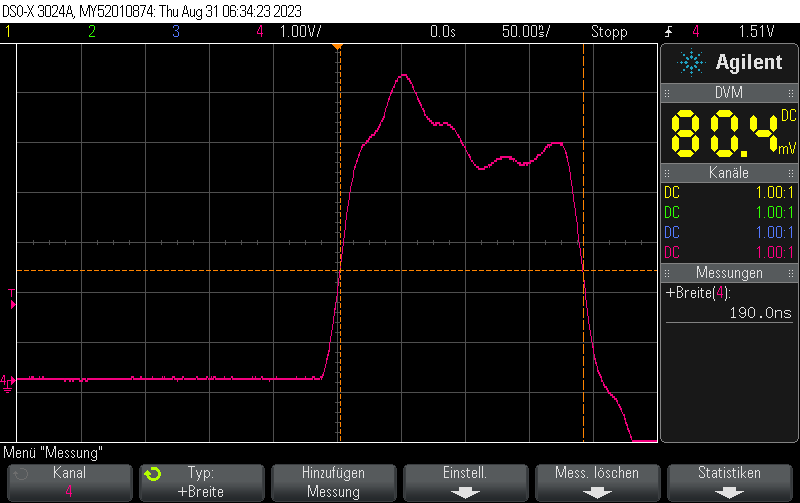
}没有 NOP 的原始代码生成宽度为 125ns 的脉冲。
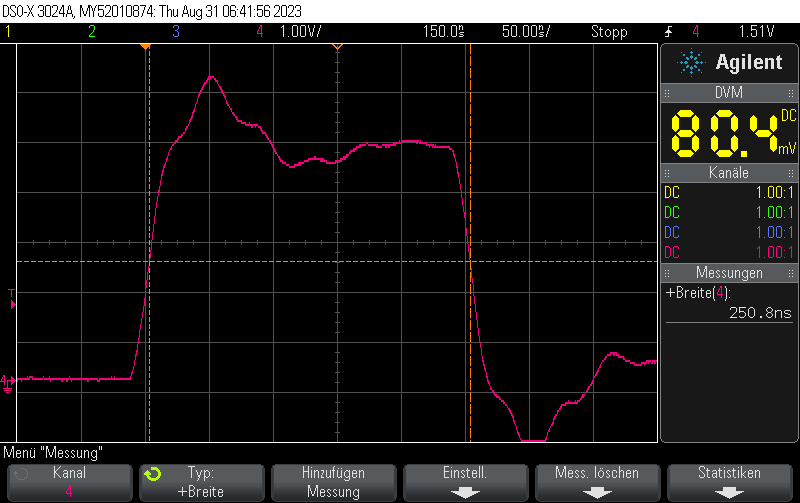
使用一个 NOP 指令,它生成宽度为 125ns + 62.5ns = 187.5ns 的脉冲:
类似地,如果我们使用两个 NOP:
nop_pulse_2.ino
cli(); // Disable interrupts
PORT11 |= PIN11_MASK; // Turn pin 11 on
_NOP();
_NOP();
PORT11 &= ~PIN11_MASK; // Turn pin 11 off
sei(); // Enable interrupts again
我们将获得宽度为 125ns + 2*62.5ns = 250ns 的脉冲:
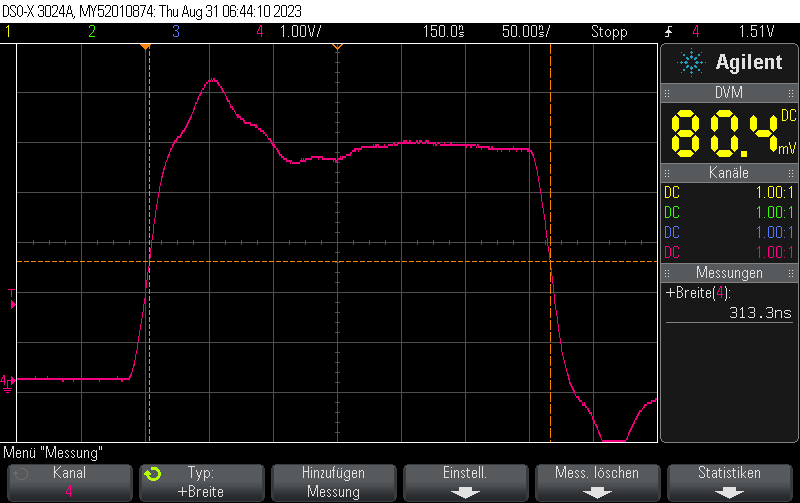
使用三个 NOP 我们将看到宽度为 125ns + 3*62.5ns = 312.5ns 的脉冲
完整示例
full_example.ino
#include <Arduino.h>
#include <avr/io.h>

#define PORT11 PORTB
#define PIN11 3
#define PIN11_MASK (1 << PIN11)

void setup() {
    pinMode(11, OUTPUT);
}

void loop() {
    cli();
    PORT11 |= PIN11_MASK;
    _NOP();
    _NOP();
    _NOP();
    PORT11 &= ~PIN11_MASK;
    sei();

    delay(10);
}Check out similar posts by category:
Arduino, Electronics
If this post helped you, please consider buying me a coffee or donating via PayPal to support research & publishing of new posts on TechOverflow